
Long time no blog. I've been in a cycling rut for the last 9 months or so, I've started mountain biking and while I have continued to ride on the road, I have not really been inspired to train nor have I been interested in evaluating any new products. For some reason that malaise has worn off so I have my new project bike.
It is a 2013 Specialized Venge (Tom Boonen Limited Edition) built with Campagnolo Super Record EPS. At this point I only have a few hundred miles on the frame and groupset so this review will primarily focus on the installation.
In researching this project I found very little information on the internet about compatibility and how to install EPS on this frame. When I settled on the Venge, this seemed like a no-brainer as Specialized offers an EPS version of the Venge. No problem then, right? Hardly....
If you are thinking of building an EPS Venge my advise to you would be stop and either go with another frame or go with a different build. In the long-run you will save yourself a lot of headaches. However, if you are set on making this work I will share what I have learned and how I overcame some of the challenges you will likely face.
Specialized does not state on their website that EPS will not work with the Venge. I spoke with four different dealers and none of them had heard that EPS would not work on this frameset either. However, without modification of the frame, I do not believe it is possible to perform the installation. In fact, when I posted questions to the help section of their website this was the response that I got:

If you are still reading I assume you are out of your mind and want to know how to do this so I will walk you through the install process. I'm sorry for the lack of photos, but I was so frustrated working through this that I did not have the energy to document it.
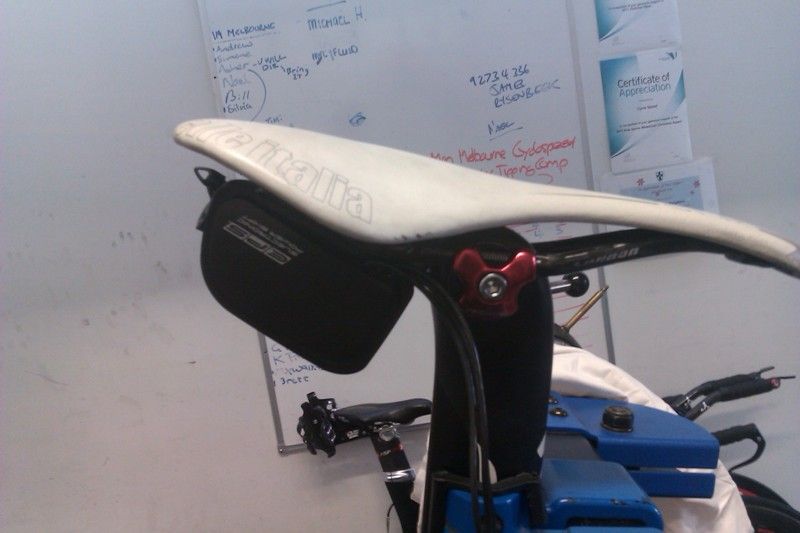
Step 1. Battery/Brain Placement- As far as I know, there are three places you can mount the battery. On the downtube, attached to the saddle rails, or under the bottom bracket.
I think in a perfect world I would want to mount the battery in the seatpost, but the battery is simply too big for that. I've heard a rumor that a redesigned battery with a smaller form will be available in the futures, but I have no idea if, when or even how small the battery would be.
The next best spot would be under the BB. It is out of the way and does not interfere with your cages plus you could route all of the cables through the under BB opening which is plenty large enough to accommodate these. The problem is that there is not a mount available that I am aware of. I think it would be possible to fabricate a mount that would be afixed to the BB cable guide mount, but this would make me very nervous. There would be a single bolt holding the battery on and it would be supporting the entire weight of the battery which would seem likely to fail after thousands of miles of road vibration plus the occasional jarring from pot holes. If you are curious about the LTD Edition EPS Venge mounting, apparently Specialized drilled mounts in the bottom portion of the downtube for this version of the frame exclusively.
Another place to mount the brain is under the saddle - specifically there is a mount that Campy makes to allow you to mount it there. I saw this posted over on weight weenies
Here is the thread link: http://weightweenies.starbike.com/forum/viewtopic.php?f=3&t=106268
To pull this off you need to purchase the EPS Under Seat Cable Set plus the EPS Non-Standard Power Unit Holder. Although I suppose you could place the battery in a seat bag and punch a hole in the front for the cables instead of dropping $75 on the mount.
The downsides to mounting here are as follows:
- You would need to drill a hole in the seatpost to get the cables inside the frame or route them externally which would be a mess. I will say that drilling a hole in a seatpost is not as scary as increasing the hole size in the frame.
-Another concern that I have about this position is that if the seatpost ever slipped suddenly, I could see it severing the cables.
-Finally, you would need to give up your seat bag which I count on in training. If you are an everything in your pockets type of guy or girl this may not matter to you.
The final option is to mount the battery on the downtube using the standard EPS mount which attaches to the frame via the bottle cage bolts. To me the downsides of mounting here are:
- The existing hole in the frame is too small so you would need to file the hole to make it larger
- On a small frame, you could run into issues that may cause you to only have room for one bottle cage (this would be a deal-killer for me)
- Under the bottle cages insures that the battery will be constantly bathed in sports drinks.
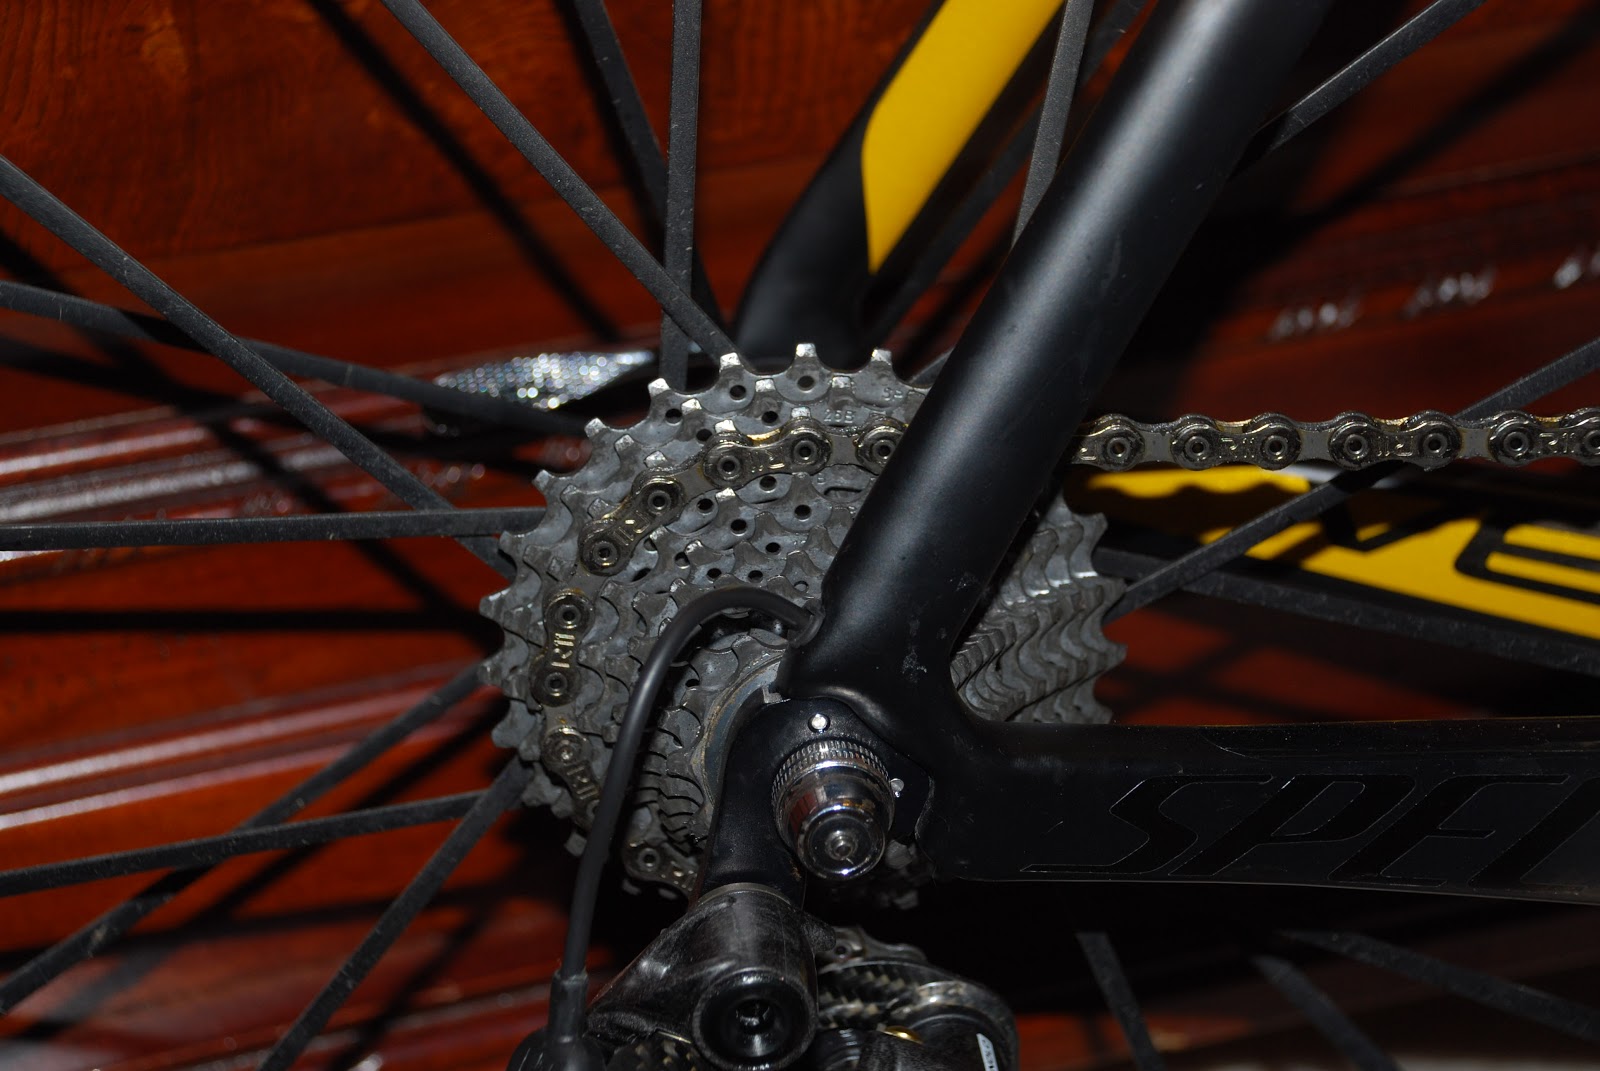
***Regardless of where you choose to mount the battery I would suggest that you make sure the hole at the rear drop out is large enough to accommodate the cable. You can check this by taking any of the cables coming from the battery and sticking the plug in the hole at the dropout. If you can feed 3 or 4 inches of cable through you should be in good shape. If not, this might be a real problem. I have a size 58 frame and it was tight, but it worked. Specialized says that some of the smaller frames may not. You might be able to take a small round file and enlarge the opening slightly, but I did not have to do this. I would note that it is not an easy fit even on my large frame. I had to move the plug around quite a bit to get it to go through the opening and I also had to work it around quite a bit to get it to come out.
I decided to use the standard mount and go with the downtube mounting position. To get this to work I bought a small round file at Lowe's and began to slowly enlarge the internal wiring opening. I would suggest doing this first and as you take away a little carbon, take the three ends coming out of the battery and see if you can get them to fit in the hole as you want the hole to be as small as possible. According to the snippet above, it requires an 8mm X 12mm opening, but I did not have to go quite that large, if you work at it you can angle the leads in such a way as to not require quite as large of an opening. That being said, and oval shaped hole seem to work best as you can push the two leads you have through the hole into the top while the final round plug fits into the lower part of the opening.

Step 2. Cable Routing
If you go to the campy website there are 5 videos that do a really good job of walking you through the installation. The first thing they recommend it affixing the battery to the standard mount and then hand tightening it to one of the bottle cage screws. I would agree this is the smart thing to do as you can swing the mount out to the side and tighten the screw and it will be out of your way.
Two other recommendations that I would make would be to remove the seatpost and the fork. This will make your life quite a bit easier as it makes access to parts of the frame much easier.
I would suggest starting with the rear derailleur cable. This was by far the most difficult part for me. If you have the campy routing magnet, give it a shot. However, I doubt it will work because when you get to the bend near the stay the two magnets will pull apart leaving the plug a few inches from the opening and I don't know how you could possible pull it through.
After quite a bit of experimenting I was finally able to pull it through, but I would warn you that this could damage your cables if you are not extremely careful so proceed with extreme caution -
If you look closely at the female portion of the plug that you will be routing through the frame you will notice two small holes where the clips from the male portion of the cable attach.

These are located on opposite sides of the plug and if utilized properly you can walk the plug through the angled sections of the chainstay. I tried this using thread, but it kept braking so I ultimately ended up buying some 8 lb fishing line to use as my rope.
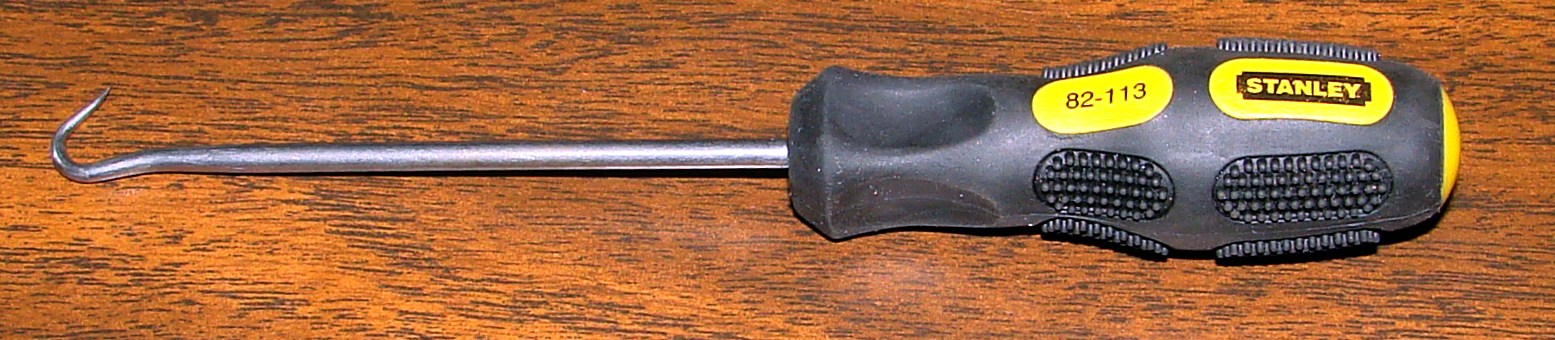
I cut two lengths of the line (long enough to go from the rear dropout opening into the downtube opening plus a couple of extra feet) and I taped these to one end of an old derailleur cable. I inserted the end that I had taped into the opening by the rear derailleur. I turned the frame upside down and let gravity keep the cable above the bottom bracket shell. This is one spot where it is handy to have the seatpost out as you can see into the frame to make sure the cable is routed properly. Once over the BB shell and while still upside down, you should see the cable go past the internal wiring opening on the downtube. At this point I used a small pick with a hook on the end to grab the cable and pull it through the opening.
I removed the tape and then tied one of the sections of line to one opening on the plug and repeated for the other side. I then pulled the derailleur cable out leaving the fishing line running through the frame. Insert the cable into the opening and gently pull the line through the frame. If you run into something in the frame that snags the cable, gently pull the cable backwards from the downtube side and pull the fishing line again. This works really well for getting around the BB shell and also for when you hit the S bend just before the opening at the drop out. When I could feel the plug get to the S-bend section, I separated the two pieces of line and I gently pulled first on one side then the other. I was able to walk the plug through pretty easily. Be extremely patient! The line is probably strong enough to brake the ring on the plug if you are not careful. If you have to pull really hard back up and try it again.
Once the cable is through you can cut the line off with a pair of scissors or side cutters being extremely careful not to clip the plug.
After the rear derailleur is through it is time to go after the front derailleur cable routing. I used the fishing line trick here as well, but the process was slightly different. Here is started out by routing the old metal derailleur cable first ( I guess a brake cable would work). Push one end of the cable into the downtube opening and let it drop out of the bottom bracket opening. Feed maybe a foot of slack through and then take the same end that came through the BB opening and push it back into the opening guiding it toward the seat tube. Keep feeding the slack through and it should pop out right in the seat tube. At this point you will definitely want a flashlight as you can see the cable clearly in the tube in relation to the hole in the seat tube. Again, I used the small hook/pick that I have to reach in through the hole and pull the cable through. This took a little while as if you have too much cable pushed through it become difficult to pull through the opeing. Also, this is where I would discourage using a brake cable as they are typically thicker and harder to bend through the opening.

Once you have the cable through both openings. Tape the two sections of fishing line to the end of the cable coming out of the seat tube. Then simply pull it through. Tie these to the plug openings as you did with the rear derailleur routing and pull it back through. The biggest challenge here is the angle coming up from the bottom is fairly steep, but if you have both pieces of fishing line attached you should be able to work it through.
If you take the fork and headset out the final routing up to the EPS control unit is pretty simple as you can use gravity to feed the cable through and you can grab it when it gets to the headset and you can feed it through the opening on the left or right. I don't think this matters too much as I have seen them routed both ways. However, if you are routing your brake cables in a traditional manner, it might make for cleaner routing to go through the left size as you could attach the two cables.


At this point I still have a little work to do with the cable routing around the stem. I ordered some 1/8" spiral wrap that should give a very clean look once installed. I also may revisit the zip ties on the Nokon cables. Small sections of black electrical tape will probably work pretty well and will not stick out quite as much.
For the rest of the setup I would highly recommend viewing the videos on the Campy site as they are excellent and provide the torque specs for mounting the components as well as showing how to zero the derailleurs.
http://eps.campagnolo.com/en/technical-support/training-online
A couple of other notes from the installation:
1. Ring compatibility - I'm a crank based power meter user, but the Campy SRM crank is stupid expensive and quite frankly I think SRM has been surpassed by Quarq in useability. For this build I went with the new Specialized Speedzone ANT + Spider. This is basically a Specialized version of the Quarq that is now branded as Specialized. I am using S-Works SL rings and S-Works crank arms which are built on the BB30 platform. I have had no problems whatsoever with this combination. I was very concerned at first, but with the different trim options the front shifting is flawless with the non-campy cranksets and chainrings.

2. The only minor hiccup I had was that with the default settings, the front derailleur cage would not swing outward far enough for the chain to fit. So I had to run the zeroing process on the front without a chain (basically I estimated .75 mm from the inside chain ring). Once I set the zero here, I had more than enough room to get the chain on and then I set the zero again and everything has worked well.
After I get some time on this setup I will come back and review the EPS system, the Venge frame, the Speciailized Quarq, the TRP 960 brakes and the 3T Rotundo Ltd bar. For those that are curious, the entire build with pedals, bottle cages, Enve 45's and computer mount came in at 15lbs 2oz and that was with a Chorus cassette. Not too bad for an aero bike. Until then....
-Tony


I was a little sick in my mouth when I see you put campy on that sexy venge :P
ReplyDeleteseems you have done the same as me..I have dropped off being a roadie for a while..been riding MTB a little too much over the last few months so have spent some of my finest queens heads on some new road kit to inject the bug back into me.
I love road cycling but with the crap weather this year in the UK the trail bike has been out more often than it should..I forgot how much fun you can have on MTB :)
This is an awesome writeup. Thanks so much for taking the time to document this. Some of these problems are Venge/Specialized specific, but it should be useful for anyone that is putting EPS onto a Di2 frame.
ReplyDeleteDid you ever upgrade the battery ? Currently about to put Eps v2 on a 2012 venge.
ReplyDeleteSands Casino: Review, Player Ratings & More - SegaCasino.com
ReplyDeleteThe Sands Casino Review 2021. Read all about what games are available on 샌즈 카지노 파트너 this casino and why they are so popular.